Posts

SSH Key with Google cloud
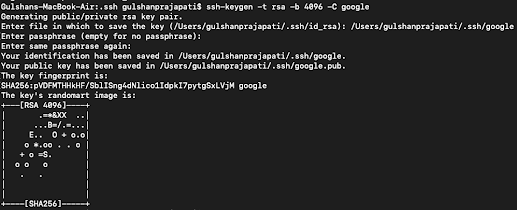
Image
 We can create 2 type of SSH key for google  1) which connect to all instance 2) which connect to particular 1 instance 1) Generate SSH key via     a) Go to a place where you want to generate ssh key     b)   ssh-keygen -t rsa -b 4096 -C keyName          Note keyName is your ssh key you can replace with any other     c) Provide path and name of ssh      d) Copy the content of keyName.pub file     e) Visit your console.google.com     Go to compute engine -> Setting -> MetaData     Add the key    2) Create a firewall rule or edit the existing ssh firewall rule with source ip with your IP if you want to secure it 3) Create an instance 4)After that got for edit 5) Option want for the person for this particular instance then click SSH Block  Final in your terminal sudo ssh -i keyName keyName@IP_ADDRESS

Add SSL in django or apche php file

 Go to https://certbot.eff.org/lets-encrypt/ubuntufocal-apache and select your software and os and get a command to install certbot 1) Install snap sudo apt install snapd 2)  Install Cert-Bot sudo snap install core; sudo snap refresh core sudo snap install --classic certbot

Create user in Linux

adduser username   Copy Set and confirm the new user’s password at the prompt. A strong password is highly recommended! Set password prompts: Enter new UNIX password: Retype new UNIX password: passwd: password updated successfully Follow the prompts to set the new user’s information. It is fine to accept the defaults to leave all of this information blank. User information prompts: Changing the user information for username Enter the new value, or press ENTER for the default Full Name []: Room Number []: Work Phone []: Home Phone []: Other []: Is the information correct? [Y/n] Use the  usermod  command to add the user to the  sudo  group. usermod -aG sudo username   Copy By default, on Ubuntu, members of the  sudo  group have sudo privileges. Test sudo access on new user account Use the  su  command to switch to the new user account. su - username   Copy As the new user, verify that you can use sudo by prepending “sudo” to the command that you want to run with

Deploy Django Project to Heroku

  Deploy Django Project to Heroku Video Tutorial:  https://youtu.be/_3AKAdHUY1M Create Heroku Account :  https://www.heroku.com/ Download and Install Git :  https://git-scm.com/downloads Download and Install Heroku CLI :  https://devcenter.heroku.com/articles/heroku-cli#download-and-install Open Terminal Login into Heroku CLI. Run below command it will open Browser then Click on Login heroku login Create Repo for Project git init Add All Files to Repo git add . Commit All Changes git commit - m "any comment" Create an App using Dashboard or Shell (I am creating using Shell) heroku create heroku_app_name Set Repo heroku git : remote - a heroku_app_name Install gunicorn or waitress - This will be our production server as we can not use development server which we were using by runing python manage.py runserver. Waitress is meant to be a production-quality pure-Python WSGI server with very acceptable performance. For More:  https://docs.pylonsproject.org/

JWT auth is not working on apache server

First of all, set up Django with apache with this      https://gulshan1996.blogspot.com/2020/08/set-up-django-with-apache.html If your  JWT auth is not working on apache server,  This is because of Apache block the header So you have to enable them by, adding this line in apache conf file WSGIPassAuthorization On WSGIScriptAlias / /home/farmafeed/manageFarmafeed/farmafeedProject/wsgi.py <Directory /home/farmafeed/manageFarmafeed> Order allow,deny Allow from all </Directory> Note:    /home/farmafeed/manageFarmafeed/farmafeedProject    this is my URL Just Add WSGIPassAuthorization On && <Directory /home/farmafeed/manageFarmafeed> Order allow,deny Allow from all </Directory>

MYSQL in mac with django

  brew install mysql-client brew install mysql-connector-c // OPTION I HAVE NOT DONE IF YOU HAVE ZSH: echo 'export PATH="/usr/local/opt/mysql-client/bin:$PATH"' >> ~/.zshrc source ~/.zshrc ELSE : echo 'export PATH="/usr/local/opt/mysql-client/bin:$PATH"' >> ~/.bash_profile source ~/.bash_profile pip install mysqlclient

Database permission error in sql lite

 sudo apt install acl setfacl -m u:www-data:rwx /home/peregrineenterprises.in/public_html/ setfacl -m u:www-data:rwx /home/peregrineenterprises.in/public_html/db.sqlite3